Deploy a MinIO Tenant
This procedure documents deploying a MinIO Tenant onto a stock Kubernetes cluster using either Kustomize or MinIO’s Helm Charts.
Deploying Single-Node topologies requires additional configurations not covered in this documentation. You can alternatively use a simple Kubernetes YAML object to describe a Single-Node topology for local testing and evaluation as necessary. MinIO does not recommend nor support single-node deployment topologies for production environments.
This documentation assumes familiarity with all referenced Kubernetes concepts, utilities, and procedures. While this documentation may provide guidance for configuring or deploying Kubernetes-related resources on a best-effort basis, it is not a replacement for the official Kubernetes Documentation.
Prerequisites
MinIO Kubernetes Operator
The procedures on this page requires a valid installation of the MinIO Kubernetes Operator and assumes the local host has a matching installation of the MinIO Kubernetes Operator. This procedure assumes the latest stable Operator, version 5.0.18.
See Deploy the MinIO Operator for complete documentation on deploying the MinIO Operator.
Check Security Context Constraints
The MinIO Operator deploys pods using the following default Security Context per pod:
securityContext:
  runAsUser: 1000
  runAsGroup: 1000
  runAsNonRoot: true
  fsGroup: 1000
Certain OpenShift Security Context Constraints limit the allowed UID or GID for a pod such that MinIO cannot deploy the Tenant successfully. Ensure that the Project in which the Operator deploys the Tenant has sufficient SCC settings that allow the default pod security context. You can alternatively modify the tenant security context settings during deployment.
The following command returns the optimal value for the securityContext:
oc get namespace <namespace> \
-o=jsonpath='{.metadata.annotations.openshift\.io/sa\.scc\.supplemental-groups}{"\n"}'
The command returns output similar to the following:
1056560000/10000
Take note of this value before the slash for use in this procedure.
Persistent Volumes
Exclusive access to drives
MinIO requires exclusive access to the drives or volumes provided for object storage. No other processes, software, scripts, or persons should perform any actions directly on the drives or volumes provided to MinIO or the objects or files MinIO places on them.
Unless directed by MinIO Engineering, do not use scripts or tools to directly modify, delete, or move any of the data shards, parity shards, or metadata files on the provided drives, including from one drive or node to another. Such operations are very likely to result in widespread corruption and data loss beyond MinIO’s ability to heal.
MinIO can use any Kubernetes Persistent Volume (PV) that supports the ReadWriteOnce access mode.
MinIO’s consistency guarantees require the exclusive storage access that ReadWriteOnce provides.
The Persistent Volume must exist prior to deploying the Tenant.
Additionally, MinIO recommends setting a reclaim policy of Retain for the PVC StorageClass.
Where possible, configure the Storage Class, CSI, or other provisioner underlying the PV to format volumes as XFS to ensure best performance.
For Kubernetes clusters where nodes have Direct Attached Storage, MinIO strongly recommends using the DirectPV CSI driver. DirectPV provides a distributed persistent volume manager that can discover, format, mount, schedule, and monitor drives across Kubernetes nodes. DirectPV addresses the limitations of manually provisioning and monitoring local persistent volumes.
Namespace
The tenant must use its own namespace and cannot share a namespace with another tenant. In addition, MinIO strongly recommends using a dedicated namespace for the tenant with no other applications running in the namespace.
Deploy a MinIO Tenant using Kustomize
The following procedure uses kubectl -k to deploy a MinIO Tenant using the base Kustomization template in the MinIO Operator Github repository.
You can select a different base or pre-built template from the repository as your starting point, or build your own Kustomization resources using the MinIO Custom Resource Documentation.
Important
If you use Kustomize to deploy a MinIO Tenant, you must use Kustomize to manage or upgrade that deployment.
Do not use kubectl krew, a Helm Chart, or similar methods to manage or upgrade the MinIO Tenant.
This procedure is not exhaustive of all possible configuration options available in the Tenant CRD. It provides a baseline from which you can modify and tailor the Tenant to your requirements.
Create a YAML object for the Tenant
Use the
kubectl kustomizecommand to produce a YAML file containing all Kubernetes resources necessary to deploy thebaseTenant:kubectl kustomize https://github.com/minio/operator/examples/kustomization/base/ > tenant-base.yaml
The command creates a single YAML file with multiple objects separated by the
---line. Open the file in your preferred editor.The following steps reference each object based on it’s
kindandmetadata.namefields:Configure the Tenant topology
The
kind: Tenantobject describes the MinIO Tenant.The following fields share the
spec.pools[0]prefix and control the number of servers, volumes per server, and storage class of all pods deployed in the Tenant:Configure Tenant Affinity or Anti-Affinity
The MinIO Operator supports the following Kubernetes Affinity and Anti-Affinity configurations:
Node Affinity (
spec.pools[n].nodeAffinity)Pod Affinity (
spec.pools[n].podAffinity)Pod Anti-Affinity (
spec.pools[n].podAntiAffinity)
MinIO recommends configuring Tenants with Pod Anti-Affinity to ensure that the Kubernetes schedule does not schedule multiple pods on the same worker node.
If you have specific worker nodes on which you want to deploy the tenant, pass those node labels or filters to the
nodeAffinityfield to constrain the scheduler to place pods on those nodes.Configure Network Encryption
The MinIO Tenant CRD provides the following fields from which you can configure tenant TLS network encryption:
Configure MinIO Environment Variables
You can set MinIO Server environment variables using the
tenant.configurationfield.The YAML includes an object
kind: Secretwithmetadata.name: storage-configurationthat sets the root username, password, erasure parity settings, and enables Tenant Console.Modify this as needed to reflect your Tenant requirements.
Review the Namespace
The YAML object
kind: Namespacesets the default namespace for the Tenant tominio-tenant.You can change this value to create a different namespace for the Tenant. You must change all
metadata.namespacevalues in the YAML file to match the Namespace.Deploy the Tenant
Use the
kubectl apply -fcommand to deploy the Tenant.kubectl apply -f tenant-base.yaml
The command creates each of the resources specified in the YAML object at the configured namespace.
You can monitor the progress using the following command:
watch kubectl get all -n minio-tenant
Expose the Tenant MinIO S3 API port
To test the MinIO Client
mcfrom your local machine, forward the MinIO port and create an alias.Forward the Tenant’s MinIO port:
kubectl port-forward svc/MINIO_TENANT_NAME-hl 9000 -n MINIO_TENANT_NAMESPACE
Create an alias for the Tenant service:
mc alias set myminio https://localhost:9000 minio minio123 --insecure
You can use
mc mbto create a bucket on the Tenant:mc mb myminio/mybucket --insecure
If you deployed your MinIO Tenant using TLS certificates minted by a trusted Certificate Authority (CA) you can omit the
--insecureflag.See Connect to the Tenant for specific instructions.
Connect to the Tenant
The MinIO Operator creates services for the MinIO Tenant.
Use the oc get svc -n TENANT-PROJECT command to review the deployed services:
oc get svc -n TENANT-NAMESPACE
NAME                               TYPE           CLUSTER-IP       EXTERNAL-IP   PORT(S)          AGE
minio                              LoadBalancer   10.97.114.60     <pending>     443:30979/TCP    2d3h
TENANT-NAMESPACE-console             LoadBalancer   10.106.103.247   <pending>     9443:32095/TCP   2d3h
TENANT-NAMESPACE-hl                  ClusterIP      None             <none>        9000/TCP         2d3h
The
minioservice corresponds to the MinIO Tenant service. Applications should use this service for performing operations against the MinIO Tenant.The
*-consoleservice corresponds to the MinIO Console. Administrators should use this service for accessing the MinIO Console and performing administrative operations on the MinIO Tenant.
The remaining services support Tenant operations and are not intended for consumption by users or administrators.
By default each service is visible only within the Kubernetes cluster.
Applications deployed inside the cluster can access the services using the CLUSTER-IP.
Applications external to the Kubernetes cluster can access the services using the EXTERNAL-IP.
This value is only populated for Kubernetes clusters configured for Ingress or a similar network access service.
Kubernetes provides multiple options for configuring external access to services.
See the OpenShift documentation on Route or Ingress for more complete information on configuring external access to services.
Deploy a Tenant using the OpenShift Web Console
1) Access the MinIO Operator Interface
You can find the MinIO Operator Interface from the Operators left-hand navigation header.
Go to Operators, then Installed Operators.
For the Project dropdown, select openshift-operators.
Select MinIO Operators from the list of installed operators.
Click Create Tenant to begin the Tenant Creation process.
2) Create the Tenant
The Form View provides a user interface for configuring the new MinIO Tenant.
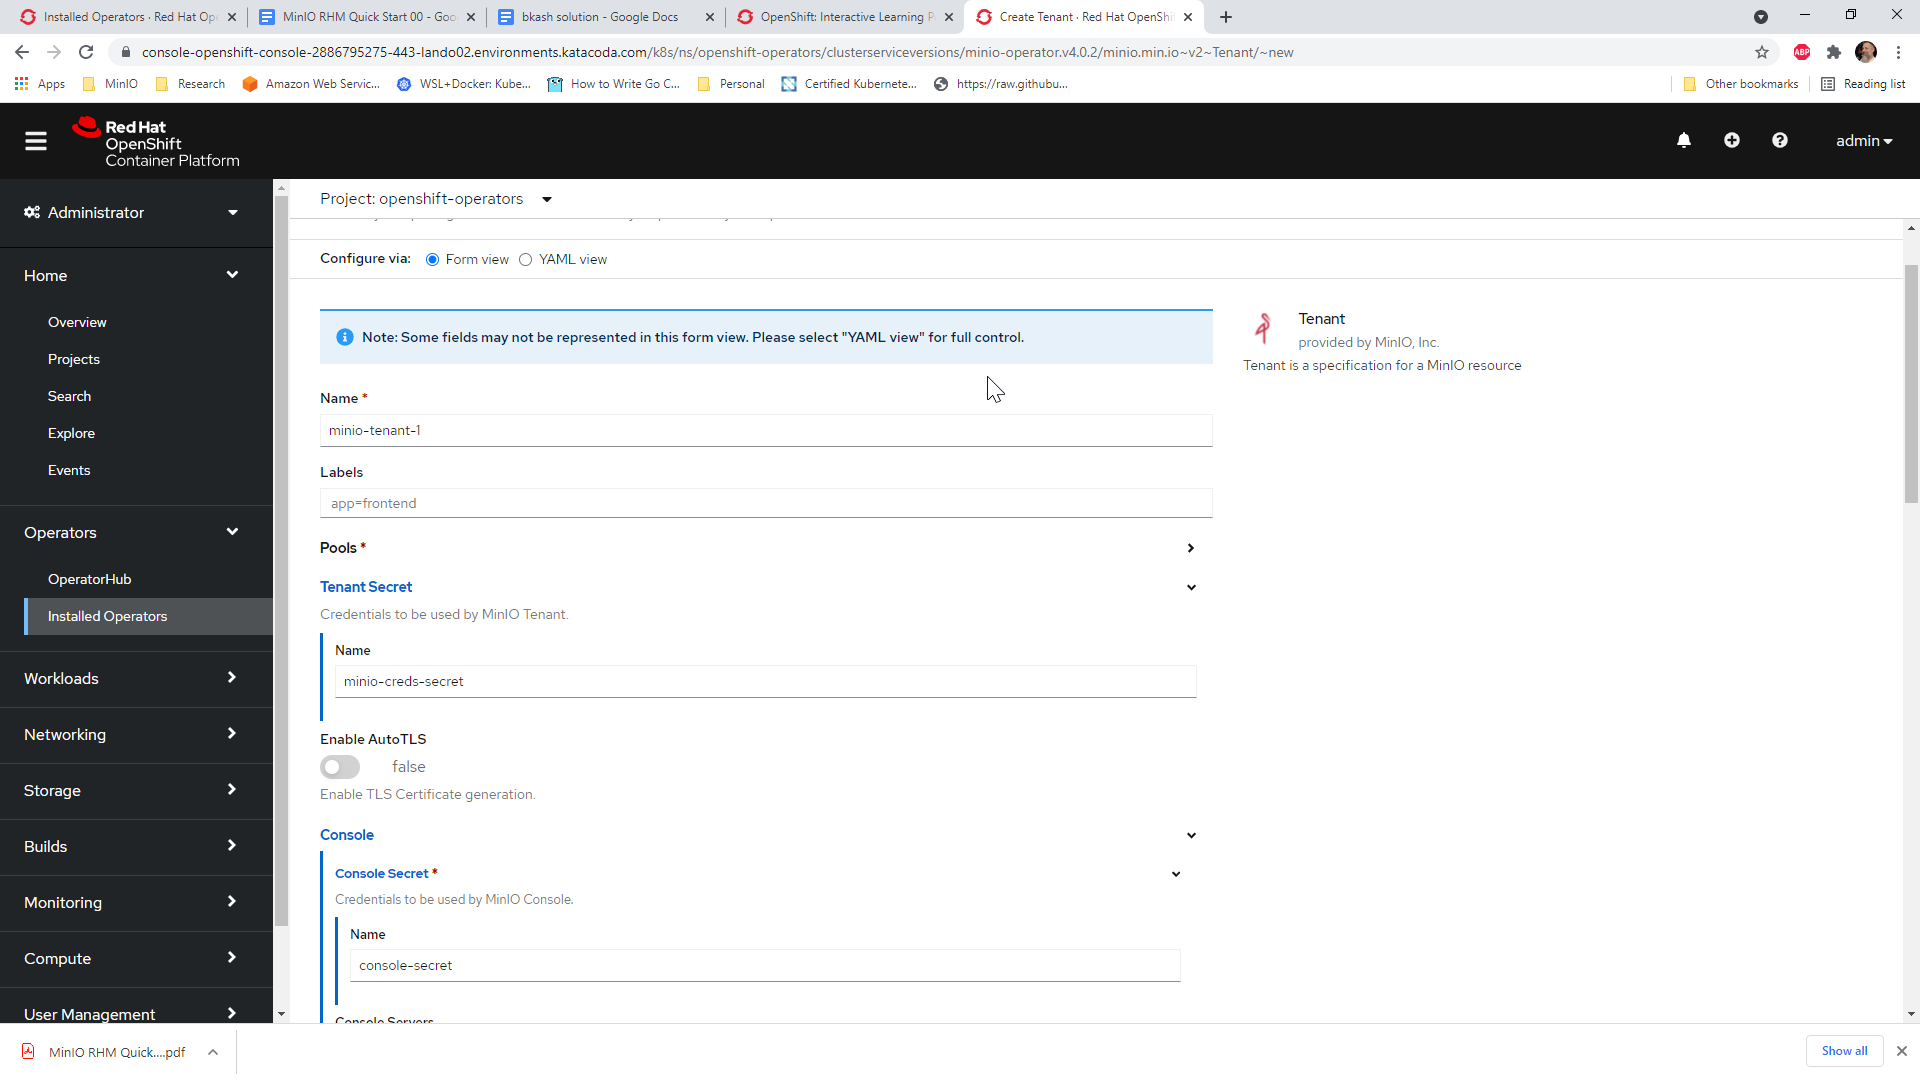
Ensure the Tenant Secret -> Name is set to the name of the MinIO Root User Kubernetes Secret created as part of the prerequisites.
Ensure the Console -> Console Secret -> Name is set to the name of the MinIO Console Kubernetes Secret created as part of the prerequisites.
You can also use the YAML view to perform more granular configuration of the MinIO Tenant. Refer to the MinIO Custom Resource Definition Documentation for guidance on setting specific fields. MinIO also publishes examples for additional guidance in creating custom Tenant YAML objects. Note that the OperatorHub YAML view supports creating only the MinIO Tenant object. Do not specify any other objects as part of the YAML input.

Changes to one view are reflected in the other. For example, you can make modifications in the YAML View and see those changes in the Form View.
Security Context Configuration
If your OpenShift cluster Security Context Configuration restricts the supported pod security contexts, open the YAML View and locate the spec.pools[n].securityContext and spec.console.securityContext objects.
Modify the securityContext settings to use a supported UID based on the SCC of your OpenShift Cluster.
Click Create to create the MinIO Tenant using the specified configuration. Use the credentials specified as part of the MinIO Root User secret to access the MinIO Server.
3) Connect to the Tenant
The MinIO Operator creates services for the MinIO Tenant.
Use the oc get svc -n NAMESPACE command to review the deployed services:
oc get svc -n minio-tenant-1
NAME                               TYPE           CLUSTER-IP       EXTERNAL-IP   PORT(S)          AGE
minio                              LoadBalancer   10.97.114.60     <pending>     443:30979/TCP    2d3h
minio-tenant-1-console             LoadBalancer   10.106.103.247   <pending>     9443:32095/TCP   2d3h
minio-tenant-1-hl                  ClusterIP      None             <none>        9000/TCP         2d3h
minio-tenant-1-log-hl-svc          ClusterIP      None             <none>        5432/TCP         2d3h
minio-tenant-1-log-search-api      ClusterIP      10.103.5.235     <none>        8080/TCP         2d3h
minio-tenant-1-prometheus-hl-svc   ClusterIP      None             <none>        9090/TCP         7h39m
The
minioservice corresponds to the MinIO Tenant service. Applications should use this service for performing operations against the MinIO Tenant.The
*-consoleservice corresponds to the MinIO Console. Administrators should use this service for accessing the MinIO Console and performing administrative operations on the MinIO Tenant.
The remaining services support Tenant operations and are not intended for consumption by users or administrators.
By default each service is visible only within the Kubernetes cluster.
Applications deployed inside the cluster can access the services using the CLUSTER-IP.
Applications external to the Kubernetes cluster can access the services using the EXTERNAL-IP.
This value is only populated for Kubernetes clusters configured for Ingress or a similar network access service.
Kubernetes provides multiple options for configuring external access to services.
See the Kubernetes documentation on
Publishing Services (ServiceTypes)
and Ingress
for more complete information on configuring external access to services.
